Paper Tea Cups #1

I’ve been messing around with paper. I’m not sure exactly why I decided to make paper teacups, but inspiration hit over the holidays and I couldn’t find one online. Hence the gauntlet was thrown down! I had to make one. It took me a lot longer than I anticipated. But I’m ecstatic with the results! This is by far and away my favourite template/ tutorial so far. AND I’ve got another version of it almost ready to upload next week.

These would be perfect as use for cupcakes, biscuits, little presents, used as gift boxes or just as gorgeous packaging. Paint them, embroider them, bedazzle them… The options are endless! I created a lid template so it becomes a very usable gift box but I had a lightning bolt moment last night and I’m now sure I’ve worked out how to make a lid that sits inside the cup so that the pretty outer lines of the teacup aren’t ruined. I’ll include it with the other version of the teacup that I’ll upload next week.

To create this project you’ll need an A4 piece of card at least 160gsm in weight (that’s what I used). I used my (now discontinued) Graphtec plotter cutter to create this project, but you could with a little time, use an x-acto knife to cut it out. I used a very strong and quick-drying gel adhesive (think superglue strong) that allowed me to put it together quickly and accurately. But it is also very unforgiving and I did stick my fingers to the first cup a couple of times! If you’re a little concerned you could easily use small pieces of double-sided tape or another preferred adhesive.

The handle, by far the fussiest part, is created by using the three pieces below.

Fold along the score lines on the long strip.

Fold along the score lines on each of the handle sides.

Then glue the tabs on one side of the handle strip to the inside of a handle side, bending the strip so that it aligns with the outer edge of the handle side. Don’t panic about a little bit of glue being seen on the inside at this point, you won’t be able to see it on the finished product.

To glue the other side on, fold the tabs on the unglued side of the middle strip so that they’re at 90 degrees and apply adhesive to the outside. Align the other handle side with the tabs, you may need to use a small pencil or skewer to get inside the handle and align the tabs up neatly.

To complete your handle just make sure that the tabs on each of the handle sides are folded in. It’s these tabs that you glue to the cup bowl.

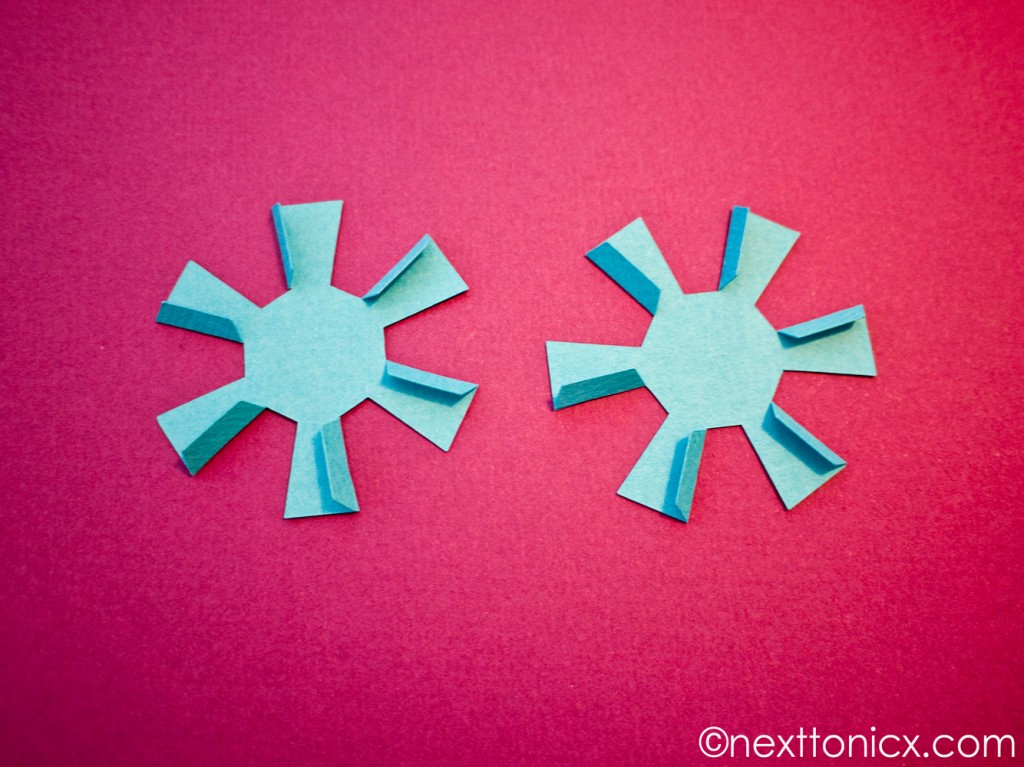
Put aside the handle and take the two large circular windmill pieces. Fold along the score lines and overlay the two pieces as shown. I’ve marked a small circle at the centre of each of the pieces to help align them if you need. Don’t glue the pieces together in the centre! If it’s slightly off your whole teacup will be a bit twisted. If you’re worried, temporarily place a pin through the centre circles and use them to align the pieces.

Glue the first centre tab on the side of each windmill arm to its adjacent windmill arm (as shown above). Make sure that the edge of each arm is aligned with the scoreline on its sister piece. Doing the centrepieces first makes sure that your teacup bowl doesn’t twist.

At this point, you continue to glue the arms together up to the top edge of the teacup bowl.

This is the view of the bottom of your tea cup bowl when it’s complete.

Don’t panic if your tops don’t align perfectly. Just trim them off neatly with scissors when you’re finished.

To put the teacup base together, take the two small windmill pieces and put them together in exactly the same manner as the teacup bowl.

The final step requires glueing the teacup base to the teacup bowl, aligning with the centre circles to do so accurately. And then glue the handle to your teacup in your preferred location. The base of the teacup handle doesn’t glue on in its entirety as I was unable to replicate the angle perfectly and each cup can be slightly different. I could have rectified it but I really like how it sits out a little and so looks more like a ‘real’ cup.

And here’s the final product! What do you think?

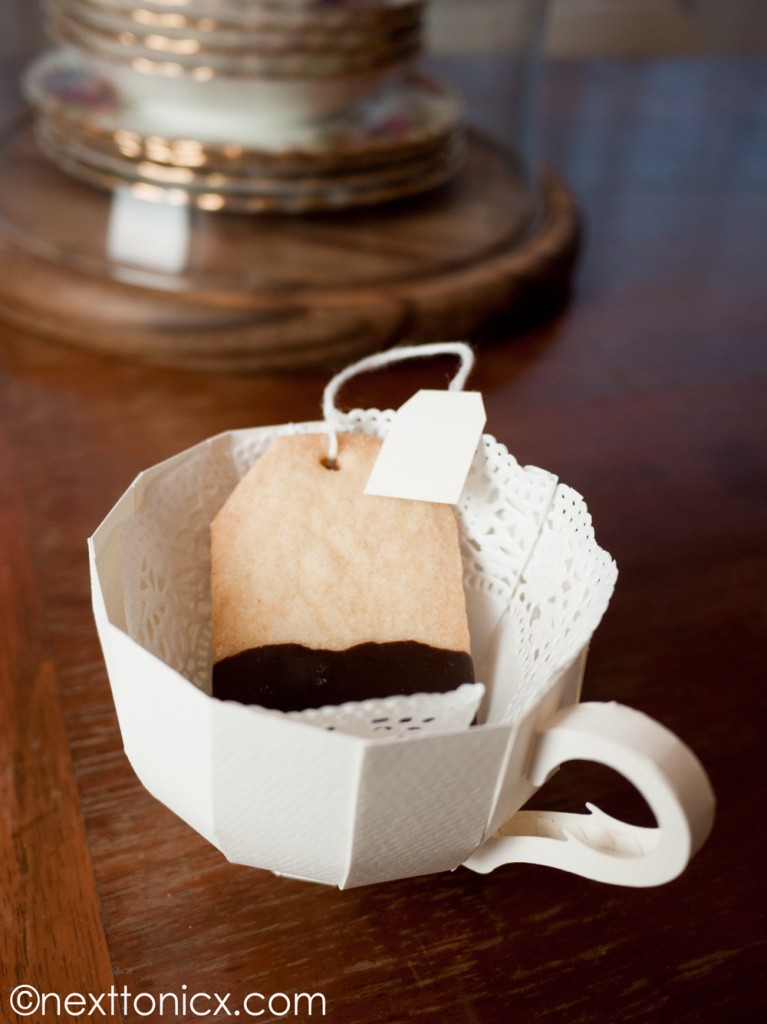
I lined the cups with small paper doilies and made some cute gluten-free shortbread tea bags to put in them. The recipe can be found here.

For the lid, cut out the two pieces and after folding along the scoreline, glue the tabs on the long strip to the inside of the lid top, aligning with the outside of the circle. It’s really quite quick and easy.

Update: I’ve created a much prettier lid for this cup template. You can find it here.

Update #2: Well over 40,000 people have downloaded this template in the past 4 years! But recently, it appears a handful are having issues with downloading it.

To download the templates, you need to click on the ‘Download’ text below. This will download a .ZIP file containing the PDF files you require. You need to ‘unzip’ this file- this is usually done automatically on your computer by double-clicking on it.

The PDF files the .ZIP contains are locked and need to be opened with Adobe Acrobat Reader (free download here). If you try to open the file with other software it will often show up as locked or will show all the layers overlapping.

I hope you have fun putting it together. I’ve loved receiving all your photos, emails, and messages showing me your gorgeous creations!
Nicx

Terms and Conditions of Use

108 responses to “Paper Tea Cups #1”

  1. Sara Avatar

    Wow, really fabulous! And one could enlarge the templates and make some giant ones too! Was thinking maybe this would be a great use for all those cornflakes boxes I’ve been saving for crafting, with the printed area on the inside, which I’d then paint and use as gift boxes. Thanks so very much for the inspiration!

    Like

  2. Nancy LeB Avatar
    Nancy LeB

    super awesome – can’t wait to try it! thank you for sharing 🙂

    Like

  3. Mira Avatar
    Mira

    Absolutely lovely! Thanks so much! 🙂

    Like

  4. Ann Martin Avatar

    Thanks Nicola – the cup is lovely, as is your tutorial!

    Like

  5. e gower Avatar
    e gower

    Wow! These are so great. Thank you for sharing.

    Like

  6. Natalia Blanco Avatar
    Natalia Blanco

    Thank you so much for so great tutorial.

    Like

  7. zoe Avatar
    zoe

    This is so lovely. Thanks for sharing your beautiful ideas.

    Like

  8. Barbara T. Avatar
    Barbara T.

    These are really great. I didnt realize they were paper at first- Beautifully done

    Like

  9. Caseye Avatar
    Caseye

    What a SUPERB craft – thanks so much for sharing!

    Like

  10. Gill Avatar

    Amazing….wonderful! Love it!

    Thank you so much for sharing. It must have taken you AGES!

    Like

    1. next to nicx Avatar

      Thank you. It did take me a while 😉

      Like

  11. next to nicx Avatar

    Thank you all for your wonderful feedback! I hope you all have a wonderful time making them. Please send me a picture of your finished product if you’ve made one? I’d love to see them!
    Nicx

    Like

  12. […] teacups from Next to Nicx / via how about […]

    Like

  13. hkdbgal Avatar
    hkdbgal

    The cups look adorable! I can’t wait to make one!
    The only problem is that I can’t seem to be able to open the pdfs on the page 😦

    Like

    1. next to nicx Avatar

      I’m very sorry, I’ve now rectified it and you should be able to download it now.
      xNic

      Like

  14. jasonmurphy Avatar
    jasonmurphy

    Love your tutorial, looking forward to try making this at home and place tea bags there.

    Like

  15. […] Teacup gift box, Floral bobby pins, Retro apron, Fork pompom, Pin up cross-stitch, Doily bowl, Suitcase table […]

    Like

  16. […] last week. But I’m really happy with the design! It goes together exactly the same as Paper Tea Cup #1 . It’s cut out of 160gsm card stock and glued together with a quick drying adhesive or double […]

    Like

  17. […] As promised, here is the very belated, revised lid I designed for my Paper Tea Cups #1! […]

    Like

  18. Darlene Avatar

    Love the paper cups. In fact, I love all paper art. Thanks so much for sharing.

    Like

  19. […] Paper Tea Cups. Hooooow whimsical! I want to do this.. but the instructions look TRES difficult. sorta like a math […]

    Like

  20. Murriyam Avatar

    Wow..I only just stumbled upon your blog. Teacups look super adorable..can’t wait to make one! Thanks so much for sharing.

    Like

  21. Carolyn Avatar
    Carolyn

    Wow, your teacups are gorgeous. Thank you so much for sharing your design. I look forward to making a few.

    Like

  22. Sushrutha Avatar
    Sushrutha

    Amazing…awesome! i fell in love with the tea cups Love them!

    Thank you very much for sharing

    Like

  23. Sarah Avatar

    Aw, so cute! That little tea bag shaped cookie is adorable too!

    Like

  24. Lilach Avatar

    This is amazing! thanks for sharing 🙂

    Like

  25. Lisa D'monte Avatar

    Hey Nicole,

    Thank you so much for sharing this fantastic teacup tutorial! My friend Suret Crause and I had a crafty catch up and made them last night. We made cute little teabag tags to go with them and for a first attempt they turned out pretty well. This is one of the best free tutorials we have come accross. I have uploaded images to my Creative Bird Studio facebook page. Thanks again xx

    Like

  26. Rhonda Miller Avatar
    Rhonda Miller

    Wow, this is fantastic. What a fun project. Thank you for sharing the template.

    Like

  27. Eunice Avatar
    Eunice

    Hey I’m a huge fan of your adorable site and I just loooove this tea cup tutorial a lot!. but Do you know that some korean blogger captured images of this tutorial and share it on her blog? and it even featured on the index page of that portal site. I just wonder if she have asked your permission to do that first. This’s the blog of her.
    http://psyelf.blog.me/100179222848
    Please check it and sorry if you knew already. Ciao

    Like

    1. next to nicx Avatar

      Hi Eunice,

      Thanks so much for letting me know. I’ve found my pictures all over the web and unfortunately there doesn’t seem to be much I can do about it. Thankfully the lady who has post these photos is still linking to me rather than copying the templates too, so I can’t complain too much.
      Thanks for following the blog! I’m so glad you like it 🙂
      Nicx

      Like

  28. Silvia Avatar

    Hi, we are two sister who usually follow your blog, we love your tea cups and today we decide to made you a mencion in our blog, I hope you like it.
    And thank you for sharing 😉

    Like

  29. Amalia Avatar
    Amalia

    Very nice! thank you for sharing!

    Like

  30. mylita Avatar
    mylita

    hi
    i used your template which i just loved. but my cups seem too skinny? I would like to buy the templates because cutting them out is well… just wondering whereabouts you are though and if you will post to australia?

    Like

    1. next to nicx Avatar

      Hi Mylita,
      I’m not sure what you mean when you say they’ve turned out too skinny? Do you have a photo of them I could look at? My email is info(at)nexttonicx(dot)com I’m based in Switzerland but I can organise to send you some tea cup templates to Australia if you wish.
      xNic

      Like

  31. Alice in Wonderland Party ideas | headsandtalesblog

    […] Alice paper teacups – Make your own paper teacups to use as decorations or as take home loot bags with a twist (fill with a small bag of lollies or treats). See Next To Nicx for a very clever tutorial on how to make these. http://www.nexttonicx.com/blog/paper-tea-cups-1/ […]

    Like

  32. Beena Avatar
    Beena

    Hi, there!

    These cups are absolutely adorable! I would love to have these at my sister’s bridal shower this August. Could I possibly have you make 40 of these for the shower? We would be more than happy to pay you! Please email me if you’re interested at all 🙂

    Like

  33. Donna Avatar
    Donna

    Absolutely Fabulous! I quickly scanned but can’t wait to read each word and hope to create a teacup for myself, too! Thank you So Much for sharing this tutorial with us; woo hoo! 🙂 Have a marvelous week!

    Like

    1. next to nicx Avatar

      Thank you! I’m so very happy you like the project! If you end up making them, please send me a photo of the results? I’d love to see them!
      Nicx

      Like

      1. Beena Avatar
        Beena

        Hi, there!
        These cups are absolutely adorable! I would love to have these at my sister’s bridal shower this August. Could I possibly have you make 40 of these for the shower? We would be more than happy to pay you! Please email me if you’re interested at all 🙂

        Like

      2. next to nicx Avatar

        Hi 🙂
        I’m so glad you like the template! Unfortunately I’m unable to take on this project at this time. I’m 35 weeks pregnant and preparing for our little ones arrival. I hope your sisters bridal shower goes splendidly!
        Nicx

        Like

  34. Brandy-Leah Avatar
    Brandy-Leah

    A few suggestions: it would have really helped if I had exact measurements when trying to make one of these myself, and a bit more detail as to how to cut the pieces to make the cups and bottoms.

    Like

  35. Cleo Naves Avatar

    Congratulations, You are simply creative. This is perfect. If you ever think on starying a business in Brazil I would recomend you or be your partner. Congrats again.

    Like

  36. […] Por favor, por favor cómo son estas tazas de papel!!!! […]

    Like

  37. Adrianac Chavez Avatar

    wonderful project, a lot of work. Thanks for sharing.

    Like

  38. Ruthie Lopez Avatar

    wow!!! I love it! thanks for sharing the tutorial and the templates!!!

    Like

  39. Angela Avatar
    Angela

    Beautiful!!! Thanks for sharing.

    Like

  40. Deb Avatar
    Deb

    Great stuff, perfect thing for my tea drinking Mum’s 70th Birthday pressie. As an avid card making she going to love receiving her gift in this xx

    Like

  41. Linda Avatar
    Linda

    Thank you for sharing your tea cup and for providing such a complete tutorial to go along with it.

    Like

  42. Deanne Avatar

    Stunning! Thank you so much for the template and great pictorial instructions. Would make elegent wedding favours or birthday favours (like for a special 60th or something). Love the design! Thanks again

    Deanne
    Sydney, Australia

    Like

  43. Julianna Avatar

    Thank you for sharing the templates and tutorial! Your cups are so wonderful! I will use them at my daughter’s birthday party, so thank you so much!

    Like

  44. Lidija Avatar
    Lidija

    These are stunning!!!! Would you be ok with me putting my patterns on these and giving them away to my mailing list recipients? I’d point them to your blog too of course. These are way too great not to share 🙂

    Like

    1. next to nicx Avatar

      I’m very glad you like them!
      I’m sorry I don’t permit commercial use of my templates.
      Please read my terms and conditions, they make it very clear how I permit sharing etc.
      Kind regards
      Nicx

      Like

  45. Melissa Avatar

    My daughter is having an Alice in Wonderland party and I am so excited to make these! Thank you for the template;)

    Like

  46. Pascale Marchal Koop Avatar
    Pascale Marchal Koop

    Wonderful teacup. Thank you so much for sharing.

    Like

  47. christelle Avatar
    christelle

    Merci beaucoup !
    thanks a lot !

    Like

  48. jane gardiner Avatar

    Hi, recently found your cups and they are great. I am planning on making a few and using them as props in still lifes – the paintings would of course be for sale, so would you be OK with that?

    All the best, Jane

    Like

    1. next to nicx Avatar

      Hi Jane,

      Thanks for contacting me. Sure, I have no problem with this.
      If you post them online, I’d love to see them! 🙂
      xNic

      Like

  49. shonah Avatar
    shonah

    I think this is the BEST thing I’ve seen all day!!! And I’ve been blog window shopping today. Seriously amazing! Can this be used as a cut file on the Silhouette??

    Like

  50. Lindsey Avatar
    Lindsey

    I can’t download the template!

    Like

    1. next to nicx Avatar

      Hi Lindsey,
      Clicking on the download button should automatically download the file.
      It’s downloaded as a .zip file. You need to open it and extract the .PDF file within.
      Hope this helps.
      Nicx

      Like

Leave a reply to next to nicx Cancel reply

I’m Nicola

I’m a maker, designer, gluten-free home baker, and global wanderer. I’m resurrecting this creative endevor after quite a few years of it laying dormant. It’s become something of a challenge, as my old site was so ancient it stopped working when I updated it!

So please bear with me as I get it all running smoothly again over the next few days.

Let’s connect